When you sell apparel online, clean, consistent visuals are non-negotiable. Ghost-mannequin editing (aka invisible mannequin or neck-join) lets you present garments as if they’re floating on a body—showing fit, structure, and interior details—without distracting props. This guide walks you through shooting prep, editing workflow, neck-join assembly, fabric-true retouching, multi-path colorways, QA, delivery formats, and FAQs. Publish-ready. No fluff.
What Is Ghost-Mannequin Editing?
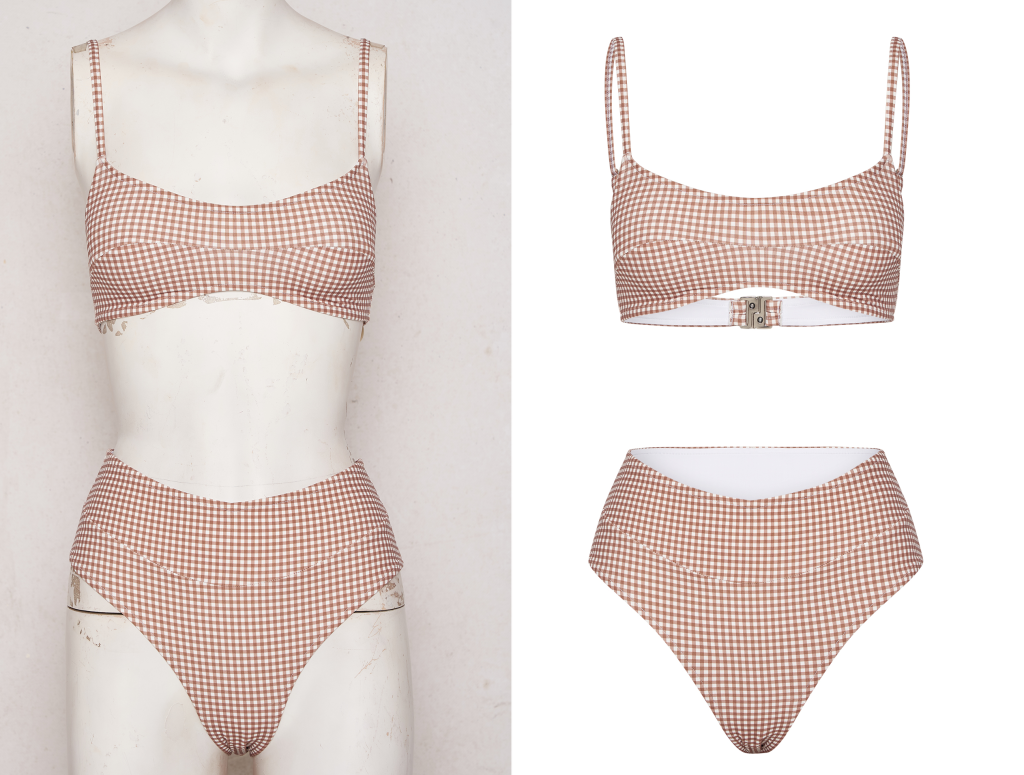
A post-production technique that removes the mannequin/model and composites inside panels (neck, cuffs, plackets, waistbands) so the garment looks naturally worn, hollow from within, and retail-catalog ready. It improves:
- Perceived fit & drape
- Consistency across large catalogs
- Brand focus (no model/mannequin distractions)
- Conversion, because shoppers can visualize the piece clearly
Shoot It Right: Capture Checklist (Saves Editing Time)
Camera & Setup
- 42–24 MP camera, 50–85 mm lens, f/8–f/11, ISO 100–200
- Even, soft lighting (two softboxes + overhead fill); avoid harsh shadows.
- Consistent height, angle, and distance; mark the floor
Garment Prep
- Steam/press; lint-roll; stuff collars/shoulders lightly for shape.
- Pin/clip symmetry; align side seams and hems; button/zip properly
- Shoot the inside panels (neck/cuff/hem) on a flat board or turned-inside-out pass
Angles & Frames
- Front, back, 45° if needed
- Close-ups: collar, cuff, buttons, zipper, fabric texture
- Inside panel passes: inner neck yoke, inner placket/cuffs, waistband/hem
The better your source shots, the faster and cleaner the ghost-mannequin build.
File Intake & Naming
Use a clear scheme so editing & assembly are foolproof:
SKU1234_Tee_Black_Front. CR3 SKU1234_Tee_Black_Back. CR3 SKU1234_Tee_Black_NeckInside. CR3 SKU1234_Tee_Black_CuffInside.CR3
Deliver RAW when possible, or 16-bit TIFF. Keep color profiles (sRGB for web, AdobeRGB/CMYK for print needs) consistent.
Core Editing Workflow (Step-by-Step)
1) Base Cleanup
- Adjust the global exposure, contrast, and white balance; then straighten and crop the image to fit the template.
- Clean up dust, lint, and threads using healing or cloning techniques, and fix seam alignment.
2) Precise Silhouette
- Use the Pen Tool to create a clipping path along the garment edges while maintaining the natural micro-waves.
- Save path; avoid over-smoothing—retain fabric character
3) Neck-Join Assembly (The “Ghost”)
- Import the inside neck shot as a layer under the base
- Transform (warp/distort) to match perspective; align stitch lines and grain
- Mask edges softly along seam lines; preserve real stitch shadows
- Repeat for cuffs, plackets, and waistband/hem if needed
4) Drape & Depth
- Dodge/Burn (low opacity) for accent folds & structure
- Rebuild the natural inner shadow where the body would be (soft brush, multiply).
- Add floors or soft shadows for grounded realism (avoid harsh drop shadows).
5) Texture-True Retouch
- Reduce wrinkles, don’t erase fabric grains.
- Keep specular highlights on satins/leather; remove plastic shine from cheap mannequins only.
6) Symmetry & Proportions
- Adjust the shoulders and hem to achieve visual symmetry, ensuring that the construction remains undistorted.
- Maintain brand template: pad/top margins, consistent crop & scale.
7) Export Stacks
- Master PSD with paths, masks, and adjustment layers (for future colorways)
- Delivery: PNG/WebP (transparent), JPEG (white or brand BG), TIFF for print
- Size buckets: Thumb / PLP Grid / PDP Zoom (e.g., 800px / 1500px / 2400–3000px)
Colorways: Fast, Accurate, and scalable.
Why multi-path? One master edit can power all colors without re-masking.
Workflow
- Build a clean master (neutral color) with multi-clipping paths for the body, collar, rib, label, and trims.
- Use Selective Color/Curves/Gradient curves, or gradient map per path to swap hues.
- Match to physical swatches / PANTONE; verify midtones and shadows, not only hexadecimal.
- Update tags/labels if they change per colorway.
Pro Tips
- Keep a Reference Board: studio light + iPhone shot of swatches under D65.
- Avoid uniform recolor on reflective trims/zips—paint back metal specularity
- Export each color in a full set (front/back/details) to keep PDPs aligned
Category Notes (How to Treat Each)
T-shirts/knit tops
- Gentle neck join; retain collar rib texture
- Watch armpit folds; add inner shadow sparingly
Shirts/Blouses
- The connection between the collar stand and the placket is crucial.
- Preserve button depth; avoid the “sticker” look.
Sweatshirts/Hoodies
- Bulkier drape; inner hood shadows for depth
- Pull cords: retain natural curve; clean fray
Dresses
- Waist/hem symmetry; internal hem reveal for premium feel
- If sheer, use masking to keep transparency believable
Jackets/Coats
- Lapel roll-line matters; pocket alignment; metallic hardware realism
- Reflective edge cleanup; maintain stitching
Denim/Bottoms
- Belt loop and fly area neatness; pocket bags are not visible (unless designed).
- Hem alignment; subtle whisker control
Lingerie/Sheer
- Image masking for lace/mesh; respect transparency and skin-tone neutrality (no color cast)
QA Checklist (10 Points)
- ☐ Edges smooth at 200–400% (no jaggies/flat spots)
- ☐ Neck-join seams align; inner shadow realistic
- ☐ Fabric texture preserved; no plastic skin
- ☐ Symmetry and alignment match the template.
- ☐ Colorway matches a swatch under D65.
- ☐ Buttons/zips/stitches crisp, true color
- ☐ Floor/soft shadows are natural, not harsh.
- ☐ No dust/lint/threads; logos clean
- ☐ File names and metadata are correct (SKU, color).
- ☐ Delivered in all required sizes/formats
Delivery Formats (Recommended)
Use Case FormatProfileBackgroundWeb PDP (zoom) JPEG 2000–3000px 2000–3000pxsRGBWhite / Brand Transparent overlays PNG / WebPsRGB TransparentMaster edit PSD (layered) sRGB/AdobeRGBN/APrint/Lookbook TIFF 300 DPIAdobeRGB/CMYK (when needed) White/Brand
Naming & SEO Tips
- Brand_SKU1234_Tee_Black_Front.jpg
- Add alt text: “Men’s crewneck t-shirt in black, ghost-mannequin front”
- Keep consistent order: Front_Back_Detail1_Detail2
Pricing Cues & turnarounds
- Base ghost mannequin (simple tees/shirts): low–mid
- Complex (jackets, dresses, sheer/lace): mid–high
- Add-ons: colorways, label swaps, heavy wrinkle removal, symmetry surgery
- SLA: bulk tees/knits within 24–48 h; complex/sheers staggered batches
Common Mistakes (and Fixes)
- Paper-flat look: add subtle inner/floor shadows; preserve fabric contour
- Over-smoothing: keep knit/denim grain; retouch only creases, not texture
- Crooked hems/shoulders: use guides; fix in the shoot or minor warp.
- Neck-join mismatch: re-warp the inside panel to stitch lines; feather the mask edges.
- Wrong colorways: always match swatches; check neutral midtones, not just highlights
Mini Workflow—Neck-Join (Quick Reference)
- For a path-based garment, place the inside-neck layer underneath.
- Warp to seam lines → 4) Soft mask seam edge
- Add inner shadow (Multiply) → 6) Global drape/dodge-burn
- QA at 200% → 8) Export set
FAQs
Q1. Ghost-mannequin vs. flat lay?
The ghost mannequin technique shows the shape and drape of clothing as if it were worn on a body, while a flat lay is quicker to set up but appears less three-dimensional.
Q2. Can I recolor any fabric realistically?
Solid cotton/knit—yes. Melange, prints, and high-gloss satins need targeted masks and texture-aware mapping.
Q3. Do I need shadows if the background is pure white?
Yes—soft, believable shadows prevent the cutout “sticker” look.
Q4. What about sheer/mesh items?
Use image masking to keep transparency; avoid turning lace opaque.
Q5. Should I keep a layered master?
Always. Future colorways, label swaps, and marketplace crops become easy.